GKFlasher Instructions
GKFlasher is an open source Python project supported by OpenGK, written by dante383 and dmg210. This project is a multi OBD2 tool for the Siemens ECUs found on the Hyundai and Kia vehicles. It can read & write tune data, correct EEPROM checksums and clear adaptive values from your ECU. The purpose of this article is to instruct you how to download, install and configure all the prerequisites for GKFlasher. If you are a GitHub user, please go star the following repository:
https://github.com/Dante383/GKFlasher
Windows 10 & 11 Installation
Prerequisites
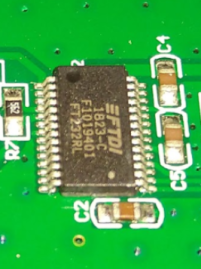
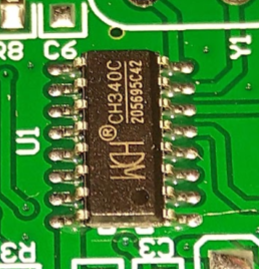
1) First you will need a FTDI USB-OBD2 interface cable. This is often the same cable used on German vehicles. The chipset on the board must be a real FTDI chip and cannot be one of the CH340C chips. Through extensive testing we found that the following cable is the least expensive and most reliable cable for GKFlasher:
Galletto 1260 ECU Chip Tuning Tool EOBD Programmer FTDI
Pictured here shows the good FTDI chipset and the bad CH340C chipset. Avoid the CH340C chipsets completely.
2) Download the following files:
Optional download for npcap if you are using a CAN BUS interface for a specific purpose:
Install GIT & Python
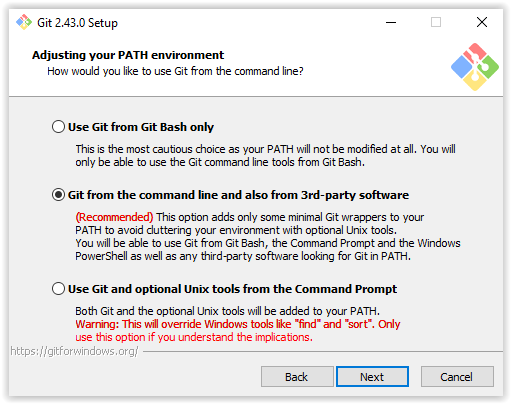
3) Open the Git install file named Git-2.44.0-64-bit.exe selecting "Git from the command line" from the following screen, then continue with all the default options afterwards:
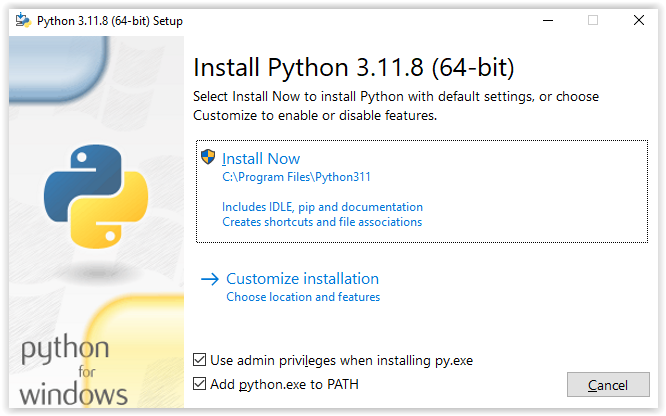
4) Open the Python installation file named python-3.11.9-amd64.exe and on the first dialogue select "Add python.exe to PATH"
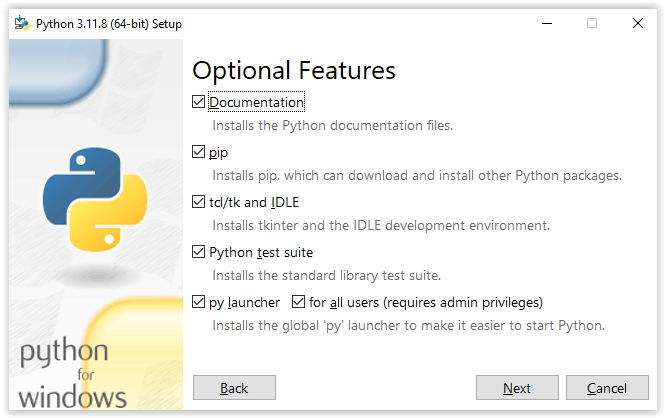
Keep all the default values on the following screen:
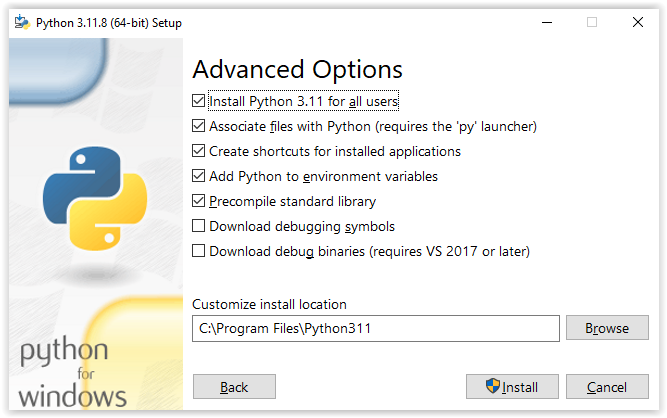
Select "Install Pyhon 3.11 for all users" from the following screen:
5) Once installation is complete you may need to logout of windows or restart your computer before the Powershell will recognize the new PATH entries for GIT and Python. To test if either program works, try the following commands after the > symbol in Windows Powershell and you should see the following responses if all is well. If you do not see these responses or receive a "ObjectNotFound" type of error, then try the above installations again.
PS C:\Users\cfham> python3.11.exe -V
Python 3.11.9
PS C:\Users\cfham> git.exe -v
git version 2.44.0.windows.1
Change libusb FTDI Drivers with Zadig
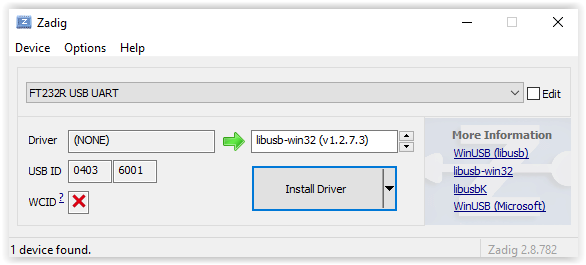
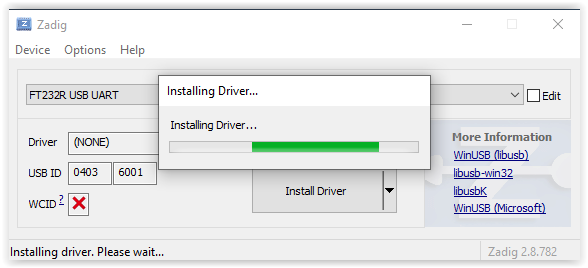
1) Plug in your USB-OBD2 device and open the previously downloaded file named zadig-2.8.exe. Select "List All Devices" from the Options menu. You should now see all of your USB attached devices in the dropdown. Select your FTDI, EOBD2, UART or FT232R device from the drop down menu, choose libusb-win32 from the driver list, then press Install Driver. Once that is complete you can close Zadig. No restart should be required, but if you experience unexpected results then you may try restarting your computer.
NPCAP Install (Optional)
1) If you are using CANBUS for your read/write functions, open and install the file named npcap-1.79.exe using default options.
GKFlasher Setup
1) Open your Powershell or Command prompt and change to the desired directory where you will be installing the GKFlasher files. A typical example directory might be in C:\GIT Repos\ so create yourself a directory in the C:\ drive named "GIT Repos" for this example. Use the following commands after the > symbol:
PS C:\Users\cfham> mkdir "C:\GIT Repos"

    Directory: C:\

Mode                 LastWriteTime         Length Name
----                 -------------         ------ ----
d-----          4/6/2024   7:10 PM                GIT Repos
2) Change to the "GIT Repos" directory and run the GIT command to download the GKFlasher files to your desired directory using the following command after the > symbol:
PS C:\Users\cfham> cd "C:\GIT Repos"

PS C:\GIT Repos> git clone https://github.com/Dante383/GKFlasher
Cloning into 'GKFlasher'...
remote: Enumerating objects: 1071, done.
remote: Counting objects: 100% (117/117), done.
remote: Compressing objects: 100% (69/69), done.
remote: Total 1071 (delta 58), reused 96 (delta 48), pack-reused 954
Receiving objects: 100% (1071/1071), 446.77 KiB | 7.45 MiB/s, done.
Resolving deltas: 100% (672/672), done.
3) Change to the GKFlasher directory then install the required Python packages with the following commands after the > symbol:
PS C:\GIT Repos> cd GKFlasher
PS C:\GIT Repos\GKFlasher> python3.11.exe -m pip install -r requirements.txt
Requirement already satisfied: alive_progress==3.1.5 in c:\users\cfham\appdata\local\packages\pythonsoftwarefoundation.python.3.11_qbz5n2kfra8p0\localcache\local-packages\python311\site-packages (from -r requirements.txt (line 1)) (3.1.5)
Requirement already satisfied: crcmod==1.7 in c:\users\cfham\appdata\local\packages\pythonsoftwarefoundation.python.3.11_qbz5n2kfra8p0\localcache\local-packages\python311\site-packages (from -r requirements.txt (line 2)) (1.7)
Requirement already satisfied: gkbus==0.1.8 in c:\users\cfham\appdata\local\packages\pythonsoftwarefoundation.python.3.11_qbz5n2kfra8p0\localcache\local-packages\python311\site-packages (from -r requirements.txt (line 3)) (0.1.8)
Requirement already satisfied: pyftdi==0.55.0 in c:\users\cfham\appdata\local\packages\pythonsoftwarefoundation.python.3.11_qbz5n2kfra8p0\localcache\local-packages\python311\site-packages (from -r requirements.txt (line 4)) (0.55.0)
Requirement already satisfied: pyqt5==5.15.9 in c:\users\cfham\appdata\local\packages\pythonsoftwarefoundation.python.3.11_qbz5n2kfra8p0\localcache\local-packages\python311\site-packages (from -r requirements.txt (line 5)) (5.15.9)
Requirement already satisfied: PyYAML==6.0.1 in c:\users\cfham\appdata\local\packages\pythonsoftwarefoundation.python.3.11_qbz5n2kfra8p0\localcache\local-packages\python311\site-packages (from -r requirements.txt (line 6)) (6.0.1)
Requirement already satisfied: about-time==4.2.1 in c:\users\cfham\appdata\local\packages\pythonsoftwarefoundation.python.3.11_qbz5n2kfra8p0\localcache\local-packages\python311\site-packages (from alive_progress==3.1.5->-r requirements.txt (line 1)) (4.2.1)
Requirement already satisfied: grapheme==0.6.0 in c:\users\cfham\appdata\local\packages\pythonsoftwarefoundation.python.3.11_qbz5n2kfra8p0\localcache\local-packages\python311\site-packages (from alive_progress==3.1.5->-r requirements.txt (line 1)) (0.6.0)
Requirement already satisfied: pyserial==3.5 in c:\users\cfham\appdata\local\packages\pythonsoftwarefoundation.python.3.11_qbz5n2kfra8p0\localcache\local-packages\python311\site-packages (from gkbus==0.1.8->-r requirements.txt (line 3)) (3.5)
Requirement already satisfied: scapy==2.5.0 in c:\users\cfham\appdata\local\packages\pythonsoftwarefoundation.python.3.11_qbz5n2kfra8p0\localcache\local-packages\python311\site-packages (from gkbus==0.1.8->-r requirements.txt (line 3)) (2.5.0)
Requirement already satisfied: pyusb!=1.2.0,>=1.0.0 in c:\users\cfham\appdata\local\packages\pythonsoftwarefoundation.python.3.11_qbz5n2kfra8p0\localcache\local-packages\python311\site-packages (from pyftdi==0.55.0->-r requirements.txt (line 4)) (1.2.1)
Requirement already satisfied: PyQt5-sip<13,>=12.11 in c:\users\cfham\appdata\local\packages\pythonsoftwarefoundation.python.3.11_qbz5n2kfra8p0\localcache\local-packages\python311\site-packages (from pyqt5==5.15.9->-r requirements.txt (line 5)) (12.13.0)
Requirement already satisfied: PyQt5-Qt5>=5.15.2 in c:\users\cfham\appdata\local\packages\pythonsoftwarefoundation.python.3.11_qbz5n2kfra8p0\localcache\local-packages\python311\site-packages (from pyqt5==5.15.9->-r requirements.txt (line 5)) (5.15.2)
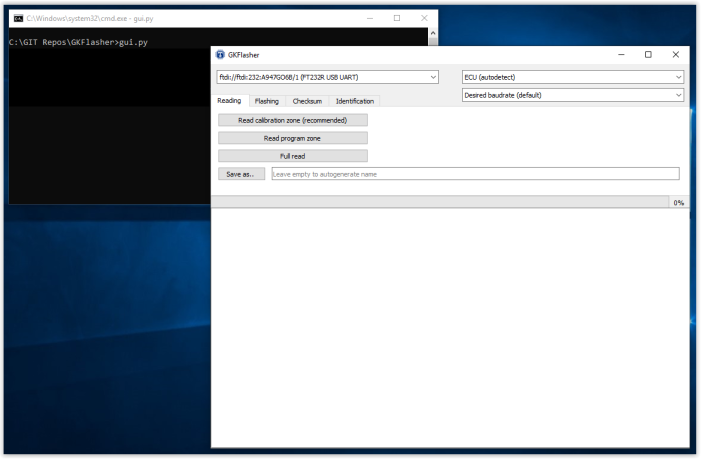
4) If everything went well you should now be able to start the GKFlasher GUI with the USB cable plugged in. Try the following command and you should see the GKFlasher window appear:
PS C:\GIT Repos\GKFlasher> python3.11.exe gui.py
5) Optional: Create a desktop shortcut to open GKFlasher easily. First we'll need to know the location of your python3.11.exe executable. Execute the following command from your Powershell or command prompt and enter the command after the > symbol. The following line you will use to copy/paste into your desktop shortcut. In this example it is located in my local user's directory within a subfolder. Yours will vary depending on your username.
PS C:\GIT Repos\GKFlasher> (Get-Command python3.11.exe).Path
C:\Users\cfham\AppData\Local\Microsoft\WindowsApps\python3.11.exe
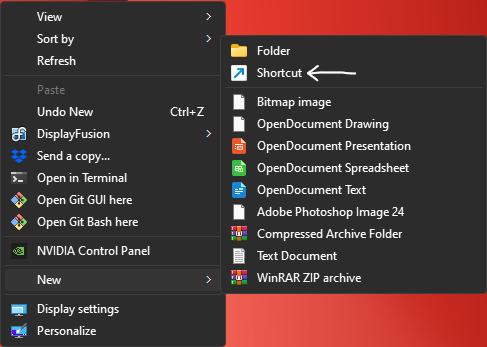
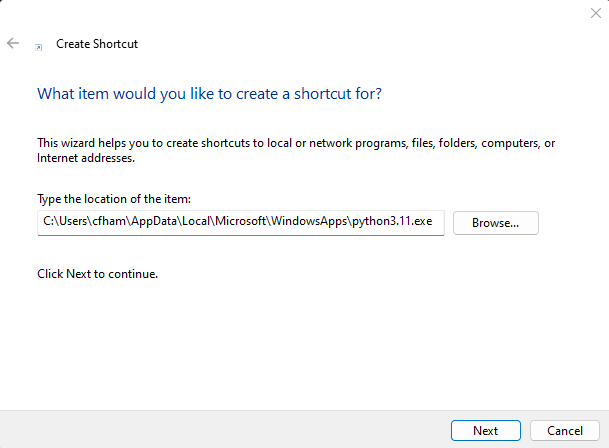
Right click on your desktop and go to "New" and "Shortcut", then paste the line you found from the last Powershell command and click next:
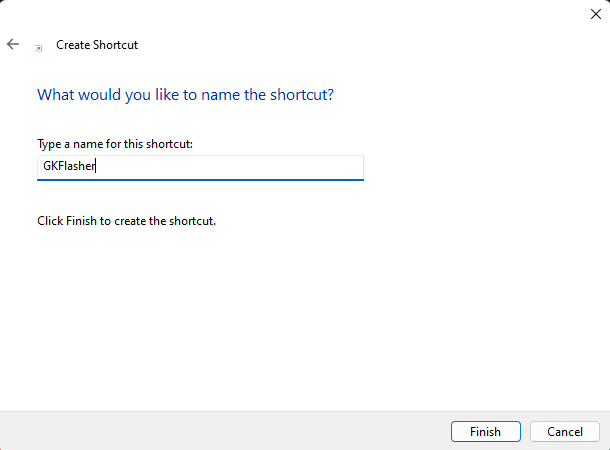
Type in "GKFlasher" into the next window and press Finish:
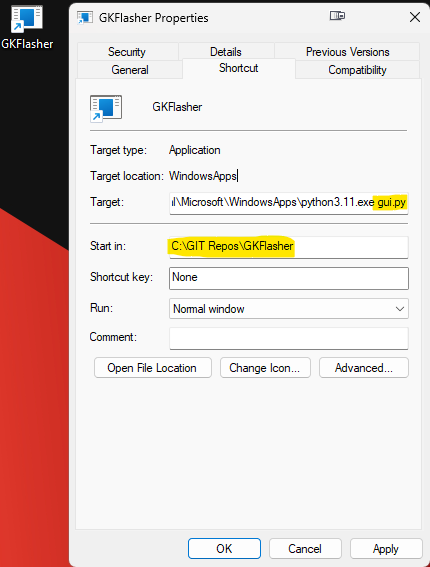
Now right click on that new shortcut and select properties. You will change a couple of settings in this new window so that it starts the GKFlasher app and change to the correct starting directory. First add " gui.py" (Contains a space) to the end of the target prompt and copy/paste the directory location you chose for your GIT Repos containing GKFlasher and press apply. The following is using my example directory. Yours may be unique.
If you would like to add an icon to your shortcut, you can download the OpenGK/GKFlasher logo from Siemens_T_Logo.ico and add it to your GKFLasher shortcut using the "Change Icon" button.
